

Troubleshooting AGP
AGP Background
The AGP expansion slot was designed to provide high speed transfers between a video card and the motherboard. An AGP slot is actually a modified version of a 66MHz 32 bit PCI slot. If you disable the AGP features, then it reverts to being a PCI slot which is twice as fast as the plain old PCI slots in most people's motherboards. AGP 1.0 was introduced in 1996 and provided the 1X and 2X speeds which are two and four times as fast as a standard PCI slot. It was followed by AGP 2.0 in 1998 which added fast writes and a 4X speed using a reduced signaling voltage. In 2002, AGP 3.0 added an 8X speed and another reduced signaling voltage. If you're interested in compatibility between AGP motherboards and video cards then check this page.
| AGP Version | Signaling Voltage | Peak Speeds |
|---|---|---|
| AGP 1.0 | 3.3 Volts | 1X at 267MB/s, 2X at 533MB/s |
| AGP 2.0 | 1.5 Volts | 1X at 267MB/s, 2X at 533MB/s, 4X at 1067MB/s |
| AGP 3.0 | 0.8 Volts | 4X at 1067MB/s, 8X at 2133MB/s |
AGP has acquired a reputation for being a bit flakey. AGP problems can cause random crashes or hangs in 3D mode, immediate crashes or hangs upon entering 3D mode, image corruption, turning off your monitor, freezing your computer, and just about anything else you can think of that involves a video card. AGP causes problems most often in 3D mode but it can sometimes get into trouble in 2D mode. On most computers, it works fine. But a surprisingly large number of computers have unreliable AGP ports. If you are seeing just about any kind of reliability problem which could possibly involve an AGP card, you should always try to slow down your AGP port to see if it solves the problem. The reason that full speed AGP and fast writes tend to be flakey is because they are transfering data like a bat-outta-hell. AGP 8X transfers data on a 66MHz clock, octuple pumped, 32 bits wide, using a non-differential 0.8V swing, usually over a four layer board (if you don't know hardware then just think "Be Afraid. BE VERY AFRAID!"). Basically, that's pushing the envelope, electronically speaking, if you're talking about low-budget consumer hardware where they're trying to shave every nickel off of their bill of materials. If you've ever seen high-speed scope traces of that data, it ain't exactly perfect ones and zeroes. If your board is laid out and decoupled properly, and the CPU, northbridge, and GPU are all nice and cool, and the power supply is keeping the rails relatively smooth, then it probably works just fine. But if any one of those links in the chain is a little weak, then you've got problems.
There two main things you can adjust to try to stabilize your AGP slot are: the AGP speed multiplier, and fast writes. If you have an overclocker motherboard then you can probably also increase the AGP signaling voltage. Technically, there are many more AGP adjustment tricks, but those are the main ones which are most likely to solve problems and most of the rest require diddling obscure options in your BIOS.
Both your motherboard and your AGP card support some or all of the AGP multipliers (8X, 4X, 2X, 1X). By default, most AGP cards are initialized to the highest multiplier supported by both. Unfortunately, that speed can be flakey, especially if it's 8X. There are various programs described below which allow you to select the AGP multiplier. Just take the AGP multiplier down to the next lower speed and then test for a while to see if your problem is solved. If not then move down to the next multiplier. Most of the programs also allow you to disable AGP mode altogether by offering a "PCI" option (sometimes called "off") when selecting multipliers. Do not take your multiplier to a higher value. The point of this exercise is to see if slowing down your AGP port can improve stability. It's not to see if you can speed up your AGP port. Only use multipliers which are at or below your default multiplier. If it turns out that using a lower multiplier solves your problem, then you have to accept that it will cost you some performance to use that solution. But if AGP 8X is not stable but AGP 4X works fine then don't worry about any performance loss. On paper, AGP 8X is twice as fast as AGP 4X but even very taxing games rarely saturate even an AGP 4X port. At most you lose a few percent by going from AGP 8X to AGP 4X. And even cutting back to AGP 2X isn't exactly going to devastate your game performance if your video card has a fair amount of RAM on it. And outside of games, the speed of your AGP port makes very little difference.
Fast writes have acquired a fairly bad reputation. They can be the cause of quite a lot of flakiness. On top of that, in most cases, they don't improve real-life performance by very much. If you really want to play it safe, you can just disable them and forget them. My opinion is that if fast writes are currently enabled then you should leave them alone while you try reducing the AGP multiplier. Fast writes are used to send data from the CPU to the AGP card without writing the data to the motherboard RAM. Fast writes transfer data at the same speed as the AGP multiplier so if fast writes are flakey, there's a good chance that the real cause is that your AGP multiplier is too high. Once you lower the AGP multiplier, fast writes may start working properly. If fast writes are disabled by default, then don't try enabling them. They may be off for a good reason. If your fast writes are currently enabled and your problem isn't solved by trying the slower multipliers, then disable fast writes and run through the multipliers starting at your default multiplier again. In a lot of cases, lowering your AGP multiplier to a stable value will make disabling fast writes unnecessary. Please note that there are some cards (apparently some kinds of Radeon 9600s and possibly others) which have performance problems if you disable fast writes. If you find more than one combination of AGP multiplier and fast writes which is stable, then just run some benchmarks and pick the combination with the best performance.
The AGP signaling voltage is the voltage of the signal used to transfer data between the AGP card and the motherboard. The signaling voltage has nothing to do with the voltage of the GPU or video RAM. You can sometimes stabilize an AGP port by increasing the signaling voltage. Only motherboards designed for overclocking are likely to support increasing it. There are two voltages which may be supported by motherboards: 3.3 volts, and 1.5 volts. The 0.8 volt value is generated differently so don't worry about that one. If you have a very old motherboard then it probably supports only 3.3 volts. Somewhat newer motherboards support both 3.3 volts and 1.5 volts. Most newer AGP motherboards support only 1.5 volts. If your motherboard supports AGP overvolting then the control will probably be in the BIOS. If the motherboard only supports either 1.5 or 3.3 volts then the BIOS usually lists the available voltages. For example, a 1.5 volt only AGP motherboard may have choices like: 1.5 volts, 1.6 volts, 1.7 volts, and 1.8 volts. If a motherboard supports both 1.5 and 3.3 volts then it will probably use a relative voltage: +0.1 volts, +0.2 volts, and +0.3 volts. Those are the amounts that it adds to the base voltage of 1.5 or 3.3 volts. Keep in mind that overvolting may stabilize the AGP port but it also heats up the chips signaling at that voltage. Overvolting by too much can cause permanent damage to both your AGP video card and the motherboard. Generally speaking, adding 0.1 volts to your AGP voltage is considered to be reasonably safe and unlikely to cause any permanent problems. But keep in mind that any time you are overvolting you can end up damaging your hardware. It's best to try to stabilize your AGP port by adjusting the AGP multiplier and fast writes before resorting to changing the signaling voltage. If increasing the signaling voltage doesn't solve your problem then reduce it back to its normal voltage to minimize the risk of damage. I'd advise against overvolting by more than 0.1 volts. Many motherboards include overvolting options which go so high that it's easy to fry your hardware. I've seen a fair number of people stabilize AGP ports by going from 1.5 to 1.6 volts but I can't recall cases of it requiring more overvoltage to stabilize. If 0.1 volts doesn't fix it then the higher voltages probably won't either and they're much more likely to damage your hardware.
AGP Adjustment Methods
Most motherboard BIOSs will allow you to adjust your AGP port. It's more common now to make AGP speed adjustments by using utilities running under Windows. But if your motherboard supports it and you don't mind fiddling around in your BIOS, then you can use it to set your AGP speed and disable fast writes. If you use your BIOS to place limits on your AGP port, then that usually prevents the Windows programs from being able to fully adjust your AGP port. It's more convenient to make the adjustments in Windows, but if none of the methods below work for you then you can try to do your adjustments in the BIOS. What BIOS adjustments lack in convenience, they make up for in reliability. AGP adjustments made in the BIOS should be very reliable so if nothing else is working, then look around in the BIOS for an option which lets you set the maximum AGP speed or enable/disable fast writes.
Sometimes, the AGP adjustment programs appear to work but actually fail to assign your new AGP settings. If you are using a method which requires a reboot, it's a good idea to go back into the program after the reboot to see if it's really at the new setting. You can also run Sandra Lite and check the "Video System Information" to make sure that AGP has been adjusted properly.
Most of the approaches below depend on certain motherboard drivers being properly installed. If they're not installed, then the AGP adjustments will either be disabled or just won't work. These drivers usually come with the motherboard chipset drivers. This page explains how to download and install chipset drivers. If you're running one of the programs below and your only choice is "AGP speed off" or "PCI mode" or you can't enable fast writes, then you should try updating your chipset drivers. The other most common reason they are disabled is because they are disabled or limited in the BIOS. If updating the chipset drivers doesn't enable the AGP controls then you should take a look in the BIOS to see if they have been limited or disabled in there.
If you have an ATI video card and you're having problems with SMARTGART, then you should reinstall your chipset drivers as explained here. A common symptom of bad or missing chipset drivers is when SMARTGART allows you to change your AGP speed to another value but it always resets to off after you reboot. If you have an ATI AGP video card but SMARTGART is nowhere to be found, then uninstall your ATI display driver as described here and then download a new display driver from ATI and install it as described here. There is no way to disable SMARTGART if it is causing problems. You can uninstall SMARTGART while leaving the rest of your ATI drivers intact by using a SMARTGART uninstaller utility you can download from ATI's support site. Unfortunately I can't give you a direct link to the utility anymore because the morons at ATI decided to prevent links into their support site. You'll just have to navigate their labarynthine website on your own. Start here and click the "Customer Care" link at the top of the page. If a drop-down menu appears when you move the mouse over "Customer Care" then just ignore it and click "Customer Care" at the top. Type "catalyst maintenance utilities" into the search box in the upper left part of the window and then click the "GO" button. Look in the search results for the "CATALYST - ATI Maintenance Utilities" link and then click it. Click the "smartgart-uninstall.exe" link to download the utility. Once SMARTGART is uninstalled, you can try using one of the other approaches to adjust your AGP port.
The programs described below which adjust your AGP port are, for the most part, very reliable. But on occasion, fiddling with your AGP port can cause your computer to hang or crash. In almost all cases, all you have to do is reboot the computer and your AGP settings will revert to their previous values. But there are some rare cases where it may not be the simple. It is a good idea to create a system restore point before adjusting your AGP settings as described here. This will allow you to easily restore your system to the state it was in before you started fiddling with your AGP port. Your chances of needing it are very small, but if you're in the unlucky few, reverting to your last restore point is a heck of a lot easier than reinstalling Windows. But if you do get into serious trouble and you neglected to create a system restore point, then try to boot in safe mode as described here and return the settings to their previous values or uninstall the program or driver which caused the problems. As long as you do things carefully, you shouldn't get into any trouble which requires more than a simple reboot. All that you're going to do to your AGP port (if you do things properly) is slow it down or disable things which are currently enabled. None of that should cause any problems because all you're doing is turning off things that you are currently using. But then again, these are low-level programs which fiddle with the registry or directly with your hardware so it's best to be careful.
Okay, now that the easily frightened people are gone, let's get down to work. There is usually more than one approach to adjusting your AGP settings. But sometimes, not all of the approaches work. If one approach doesn't work then move on to the next. This page describes adjusting your AGP port using the following approaches:
- ATI Catalyst Control Center SMARTGART
- ATI Control Panel SMARTGART
- NVIDIA CoolBits
- PowerStrip
- NVIDIA RivaTuner
If you have an ATI video card, then the best way to start is to use the AGP adjustment controls provided by ATI. They have a reputation for being very safe and work on almost any hardware. If your video drivers include the Catalyst Control Center then use the Catalyst Control Center SMARTGART. If not then use ATI Control Panel SMARTGART. If you have an ATI video card and can't find either version of SMARTGART, then you should update your video drivers. Only very old ATI drivers do not have SMARTGART support and it is the easiest and most reliable way to adjust an ATI AGP port. But if neither version of SMARTGART is working then you can try PowerStrip. If you have an NVIDIA card, then you should try NVIDIA CoolBits first because it uses controls provided by NVIDIA. If that doesn't work then you can try PowerStrip. If PowerStrip has problems then you can try NVIDIA RivaTuner. If your AGP card isn't an ATI or NVIDIA, then just try PowerStrip.
Using the SMARTGART control panel to adjust AGP settings
To access the SMARTGART control panel, open the "Control Panel" and then double-click "Display" to bring up the "Display Properties" window. Then select the "Settings" tab, click the "Advanced" button, and then select the "SMARTGART" tab. If you don't have a "SMARTGART" tab but you do have a "CATALYST Control Center" tab, then continue with the Catalyst Control Center instructions here. If you don't have either tab and you have an ATI video card, then you may have very old ATI drivers or your drivers may not be properly installed. If you want to use the SMARTGART method then you need to install the ATI drivers. If you don't already have a set, you can download the latest ATI drivers from ATI. If you can't get them to work then you can always try PowerStrip.
The controls for the AGP speed are in the top half of the "AGP Settings" section. The horizontal slider allows you to set the AGP speed. Any speeds which are not available will be grayed out. This computer can try only 8X, 4X, and off (PCI mode). To change the AGP speed just drag the slider left or right to the desired speed. If you drag it to "Off" then fast writes are automatically disabled. Once you have set it to the desired value, click "OK" and then you will be prompted to reboot. When it reboots, SMARTGART checks to see if your new settings pass its reliability tests. If they pass the tests then your AGP port will be at your new settings after every reboot.
The controls for fast writes are in the bottom half of of the "AGP Settings" section. To disable fast writes just click the little circle to the left of "Off". To enable them click the circle to the left of "On". Make the change and then click "OK" and reboot.
On my machine, SMARTGART sometimes refuses to change both the AGP speed and fast writes without rebooting after each individual change. You can tell if SMARTGART has made the changes by bringing up the SMARTGART window after a reboot and checking its new settings. If your machine works like mine, then just change one value and reboot and then change the other value and reboot.
Using the CATALYST Control Center to adjust AGP settings
To access the CATALYST Control Center, double-click the ATI icon in your taskbar tray which is usually in the lower right-hand corner of the screen. If it isn't in your tray then click "Start" and then "All Programs" or "Programs" and select the "ATI Catalyst Control Center" entry and click "ATI Catalyst Control Center".
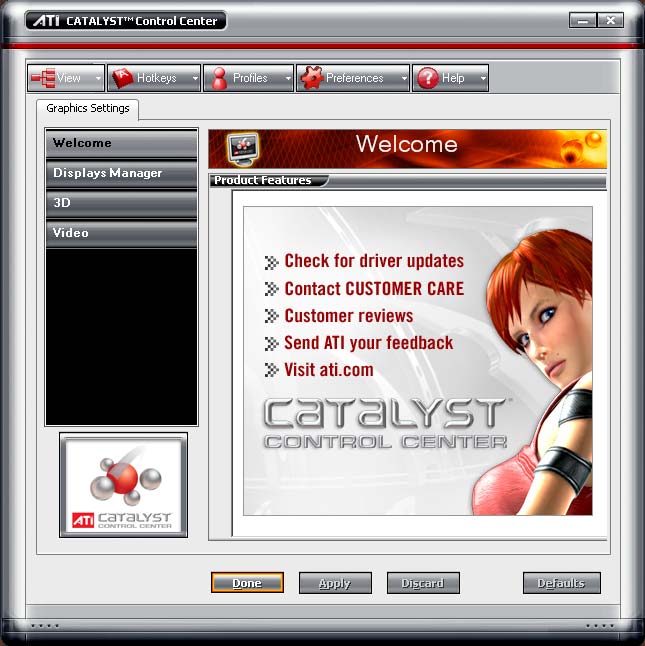
If you end up with this standard view screen, then click the "View" button in the upper left-hand corner of the window. That will change to the advanced view screen.

Then click the "SMARTGART" entry in the list on the left.

The horizontal slider to the right of "Set AGP Speed" controls the speed multiplier of your AGP port. Any speeds which are not available are grayed out. To the right of "Fast Write" are two small buttons which turn fast writes on and off. If you set the AGP speed to "Off" then it automatically disables fast writes. Just drag the horizontal slider and click the fast write "on" or "off" button to select your new AGP settings. Then click "Done" and it will prompt you to reboot. When it reboots, SMARTGART checks to see if your new settings pass its reliability tests. If they pass the tests then your AGP port will be at your new settings after every reboot.
Using CoolBits to adjust AGP settings
CoolBits is actually a registry key which allows you to access some hidden control panel windows provided by NVIDIA. The default driver installation does not allow access to these windows because some of them can be a bit dangerous. NVIDIA hides them from most users but allows access to them by people who make the necessary registry changes. You don't have to be a registry hacker to use CoolBits. All you have to do is download this file and double click it. If you clicked the link and it opened as a text file, then right-click it and do a file save and then double-click the file. Windows then asks you if you want to add some things to the registry. Click "Yes" and then you will have access to some new control panel windows. On some operating systems, you may have to reboot before they become accessable.
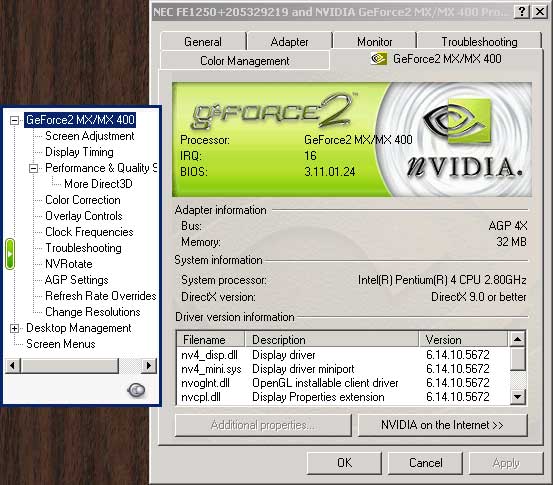
Once you've run the coolbits.reg file, open the "Control Panel" and then double-click "Display" to bring up the "Display Properties" window. Then select the "Settings" tab and click the "Advanced" button. Then select the NVIDIA tab and click the "AGP Settings" entry in the list on the left. If you don't have an "AGP Settings" entry then CoolBits doesn't work with the NVIDIA drivers you have installed. You can probably get it to work by updating to more recent NVIDIA drivers. You can download those from here.
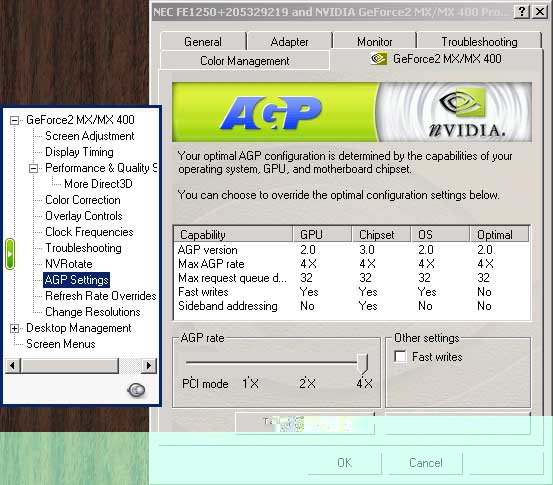
The "AGP Rate" section contains a horizontal slider bar which allows you to control the AGP speed. Just drag the bar left or right set to the AGP speed multiplier. Fast writes can be enabled by checking the "Fast writes" box in the "Other settings" section or disabled by unchecking it. Once you have made your changes click the "Test configuration" button to make sure the new settings work during a short test. If your window doesn't have a "Test configuration" button then just click "Apply" or "OK". Any settings which you change will be set to the new values every time Windows boots. I've noticed that CoolBits appears to refuse to make the requested settings change on some systems. For example, after dragging the AGP speed bar to your new speed, CoolBits sometimes returns the bar to its previous position. If it does that then reboot your system and then check to see if the new setting took affect. In both systems where I've seen this behaviour, the system was running at the requested setting after a reboot. Sometimes CoolBits doesn't manage to successfully change the AGP settings. In those cases, give PowerStrip or RivaTuner a try.
Using PowerStrip to adjust AGP settings
PowerStrip is a shareware program which you can try out for free. It works on a wide variety of hardware and works with all versions of windows starting with Windows 95. If you don't have an ATI or NVIDIA based video card, then this is probably the easiest way to try to adjust your AGP slot.
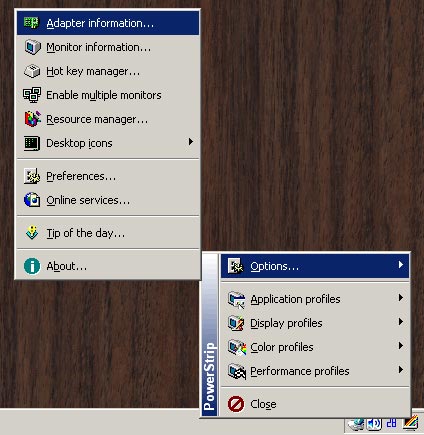
Once you install PowerStrip and run the program, you can access the program from its icon in the taskbar tray area which is usually in the lower right hand corner of your screen. PowerStrip's icon is the little monitor with the diagonal lines on it. To get access to the AGP settings area, click the PowerStrip icon, then click "Options", then click "Adapter information".
Once you have the "Adapter information" window open, you have to uncheck the "Read-only" box aimed at by the red arrow. Once the "Read-only" box is unchecked you can change the AGP settings in the "AGP system configuration" area. The "1X", "2X", "4X", and "8X" transfer rate boxes control the speed of your AGP port. Any speeds which are not available are grayed out. Just click the box for the next lower transfer rate to try a slower AGP speed and then click "Ok". To disable fast writes, uncheck the box to the left of "Fast write protocol" and then click "Ok".

This window then asks you whether you want these changes to take effect whenever PowerStrip starts. Just click "Ok". That will arrange for your new setting to be assigned whenever the computer boots up. The AGP port will be at your new settings until you change them or uninstall PowerStrip.
Then another window asks if you want the changes to take place in real-time. Just click "Cancel" and then reboot your computer. Once you reboot, the new settings take effect.
Using RivaTuner to adjust AGP settings
RivaTuner is a free program which can make many adjustments to NVIDIA cards. It also provides some support for ATI Radeon cards starting with the Radeon 8500. It can, on rare occasions, cause some serious problems when making adjustments to your AGP port. On most computers, it works just fine. But now and then it has been known to prevent computers with certain chipsets from rebooting after adjusting AGP. You should only use RivaTuner if you know what you're doing. It reportedly works very well on motherboards with Intel chipsets. On other chipsets it has a good but not spotless record. If you don't know what a motherboard chipset is, then you probably shouldn't use RivaTuner. RivaTuner does not support Windows 95.
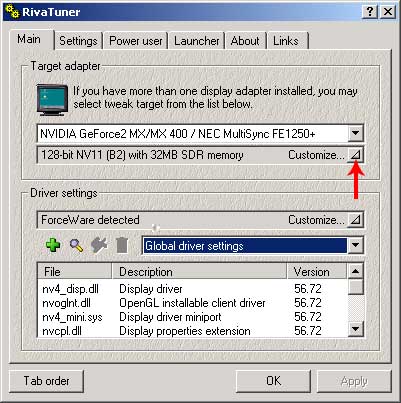
Execute RivaTuner and then click the button aimed at by the red arrow.
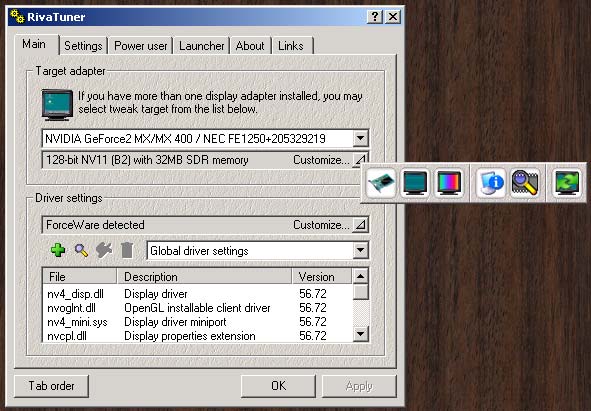
Then click the little video card in the window which pops up. In the image above, that's the one on the left.
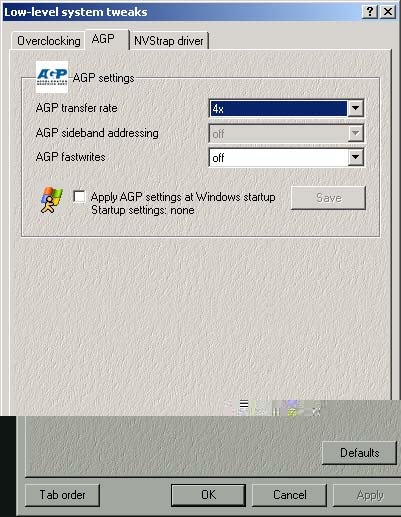
That brings up the window which includes the low-level system tweaks. Then select the "AGP" tab. You can control the AGP speed multiplier by selecting an entry in the "AGP transfer rate" drop-down list. You can enable or disable AGP fastwrites by selecting "on" or "off" in the "AGP fastwrites" drop-down list. Once you have selected new AGP settings, click "Apply" or "OK" to set the values immediately. You have to check the box to the left of "Apply AGP settings at Windows startup" to select the new settings everytime Windows boots. If you don't check the box, then AGP reverts to its old settings the next time your reboot. Given RivaTuner's occasional problems adjusting AGP settings, it's a good idea to leave the box unchecked until you're sure that RivaTuner's settings are working.
Home| Contact | Products | Support |Infomation |||
![]()