

Troubleshoot your video card by underclocking
Video Card Clock Rates
The silicon chips on your video card run faster when they are cooler. Increasing the clock rate heats the chips up which slows them down. The point of underclocking is to try to find a lower clock rate at which your video card runs reliably. If a previously troublesome video card becomes stable when underclocked then it means that you have a hardware problem rather than a software problem. It may be a weak chip which means you have to replace the card. It may also be a cooling problem which may be caused by bad airflow in your case or an improperly installed heatsink. It's also possible for the problem to be an overloaded power supply because underclocking also reduces power consumption.
You can underclock your video card by using an overclocking program. They are usually used to increase clock rates but they can also be used to decrease them. A video card has two clocks which you can underclock: the GPU clock, and the video RAM clock. You should reduce each of the clock rates individually to see if underclocking solves your problem. If that doesn't work then try reducing both of them at the same time. When you're reducing the clock rate, reduce it in small increments rather than all at once. Some components can become unstable when underclocked by too much. Just reduce the clock rate by a small amount like 10% and then test the card. If that doesn't solve the problem then continue to reduce it in small steps. GPUs can usually be underclocked as much as you want but there's not much point in going beyond cutting the clock rate in half. Video RAM often has problems when underclocked by too much. Take it down to half its original clock rate if possible. If you start getting screen artifacts when underclocking the memory, then just stop at the lowest clock rate where there are no artifacts. If your video card has DDR memory, then the clock rate which appears in the overclocking program may be half of what you expect. It is common for 200 MHz DDR memory to be refered to as 400 MHz but that's not technically correct. The programs usually modify the actual clock rate which is, in this case, 200 MHz.
The overclocking programs described below are usually very reliable. But now and then they can cause your computer to hang or crash. Since you are going to be underclocking rather than overclocking, there shouldn't be any problems. But if there is a problem you can almost always solve it by rebooting your computer. When it reboots, your video card will normally be returned to its previous clock rates. There are rare occasions when overclocking programs can have compatibility problems so it a good idea to play it safe before using them. If your operating system supports it, you should create a system restore point so you can roll your setup back to its previous state before you started using the overclocking program. If you have serious problems then you can boot in safe mode as described here and return the clock values to their previous values or uninstall the program which caused the problems.
Overclocking is very popular among hardware enthusiasts so there are lots of different overclocking programs. This page shows how to underclock using the following approaches:
If you have an ATI card and you're using Windows 2000 or Windows XP, then you should start with ATITool. It has an artifact checker which can help you determine when your card is functioning properly. If that doesn't work on your ATI card, then you can try PowerStrip. If you have an NVIDIA card, then you should start with CoolBits because it uses controls provided by NVIDIA. If that doesn't work then you can try PowerStrip. If PowerStrip has problems then you can try RivaTuner . If your card isn't an ATI or NVIDIA, then just try PowerStrip.
Using ATITool to underclock your video card
ATITool is a free utility which is used to overclock ATI video cards. It does not support Windows 95, Windows 98, or Windows ME. It also includes a handy artifact checker to help overclockers determine when they've gone too far.

The vertical slider bar on the left controls the GPU clock rate and the slider bar on the right controls the memory clock rate. Drag the bars downward to reduce the clock rates. Once you have selected your clock rates, click the "Set Clock" button to assign the new clock rates. Once you've set the clocks, you can click "Scan for Artifacts" to see if the new clock rates are getting errors while drawing in 3D mode. Click the "Default" button to restore the clock rates to their original values.
These clock rates will only persist until the next time you boot Windows. To arrange for the clock rates to be set to your new values every time Windows boots, click the "New" button. Then select a name for your new profile. The new profile will be created with the clock rates which are currently set. Then click the "Settings" button.
Then select "Startup" in the list which appears at the top of the window. Put a checkmark in the "Every time ATITool is launched, load profile:" box. Then select your new profile from the list immediately below. Then make sure the "Load on Windows Startup via:" box is checked and select "Start Menu (all users)" from the list immediately below. Then put a checkmark in the "When loaded via Windows Startup, exit after loading above profile." box. Then click the "Back" button.
Using CoolBits to underclock you video card
CoolBits is actually a registry key which allows you to access some hidden control panel windows provided by NVIDIA. The default driver installation does not allow access to these windows because some of them can be a bit dangerous. NVIDIA hides them from most users but allows access to them by people who make the necessary registry changes. You don't have to be a registry hacker to use CoolBits. All you have to do is download this file and double click it. If you clicked the link and it opened as a text file, then right-click it and do a file save and then double-click the file. Windows then asks you if you want to add some things to the registry. Click "Yes" and then you will have access to some new control panel windows. On some operating systems, you may have to reboot before they become accessable.
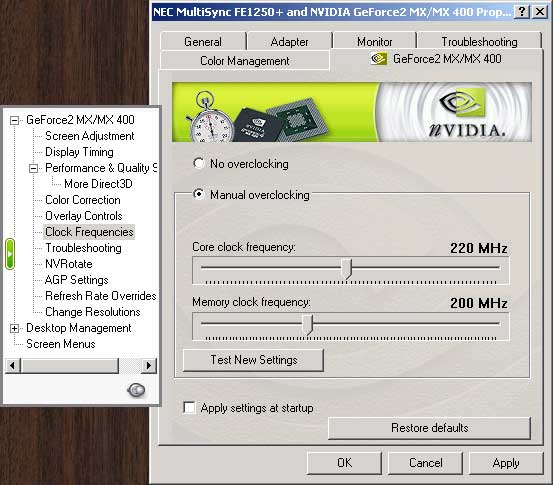
Once you've run the coolbits.reg file, open the "Control Panel" and then double-click "Display" to bring up the "Display Properties" window. Then select the "Settings" tab and click the "Advanced" button. Then select the NVIDIA tab and click the "Clock Frequencies" entry in the list on the left. If you don't have a "Clock Frequencies" entry then CoolBits doesn't work with the NVIDIA drivers you have installed. You can probably get it to work by updating to more recent NVIDIA drivers. You can download those from here.
Click the little circle to the left of "Manual overclocking" to enable changing of the clock rates. The "Core clock frequency:" horizontal slider bar sets the GPU clock rate. The slider bar below it sets the memory clock. Drag the slider bars to the left to slow the clock rates down. Once you've made your changes click the "Test new settings" button to make sure the new clock rates work during a short test. If your window doesn't have a "Test new settings" button then just click "Apply" or "OK". These settings will be discarded the next time Windows boots. Check the "Apply settings at startup" box if you want these new clock rates to be assigned every time Windows boots. You can restore the original clock rates by clicking the "Restore defaults" button.
Using PowerStrip to underclock you video card
PowerStrip is a shareware program which you can try out for free. It works on a wide variety of hardware. If you don't have an ATI or NVIDIA based video card, then this is an easy way to underclock your video card. Its primary limitation is that it often doesn't allow you to underclock your video card by that much. Other overclocker programs often allow you to select a larger range of clock speeds.
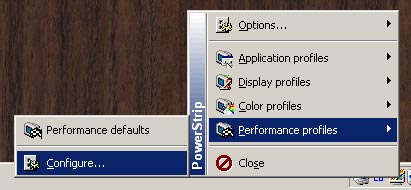
Once you install PowerStrip and run the program, you can access the program from its icon in the taskbar tray area which is usually in the lower right hand corner of your screen. PowerStrip's icon is the little monitor with the diagonal lines on it. To get access to the clock rate controls, click the PowerStrip icon in your taskbar tray, then click "Performance profiles", then click "Configure".
The two vertical slider bars on the left side of the window under "Clock controls" are used to set the clock rates for the video card. The left slider bar controls the GPU clock rate which this window calls the "engine clock". The right slider bar controls the video RAM clock rate which this window calls the "memory clock". As you drag the slider bars up and down, it updates the values in the "engine clock" and "memory clock" areas to show you the new clock rates. PowerStrip doesn't actually change the clock rates until you click "Ok" or "Apply". Once you are satisfied with the clock rate values, click "Ok".

Then this window pops up to ask you if you want to keep these changes. PowerStrip does this in case your new values caused some kind of problem. You have to click "Yes" within ten seconds to keep the new values. If you do nothing or click "No", then PowerStrip changes your clock rates back to their previous values. If you have PowerStrip configured to start up every time your computer boots (the default installation works that way), then it will set your new clock rates every time Windows boots.
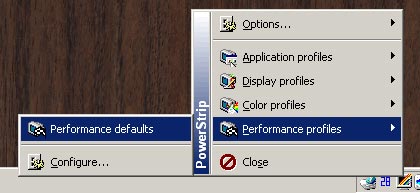
Once you're done trying different clock rates, you may want to restore your video card to its default clock rates. To do that, just click the PowerStrip icon in the taskbar tray, then click "Performance profiles", then click "Performance Defaults".
Using RivaTuner to underclock your video card
RivaTuner is a free program which can make many adjustments to NVIDIA cards. It also provides some support for ATI Radeon cards starting with the Radeon 8500. It does not support Windows 95.
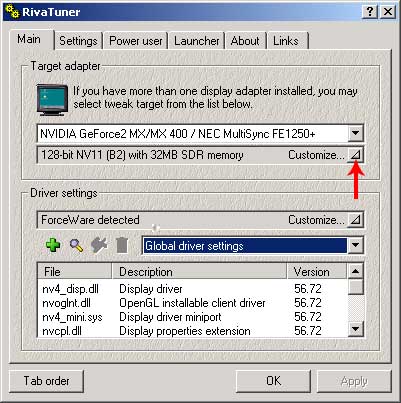
Execute RivaTuner and then click the button aimed at by the red arrow.
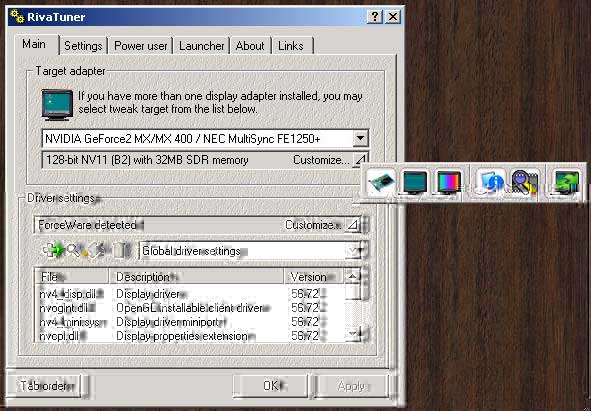
Then click the little video card in the window which pops up. In the image above, that's the one on the left.
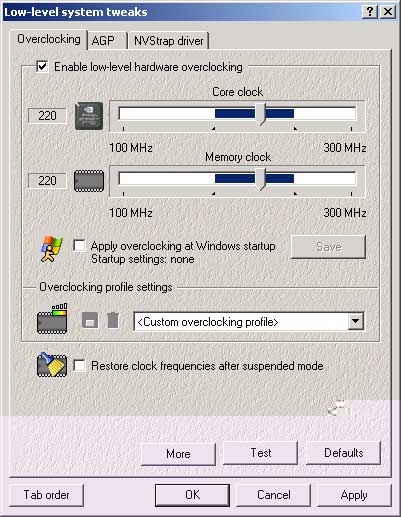
That brings up the window which includes the low-level system tweaks. Select the "Overclocking" tab and make sure that the "Enable low-level hardware overclocking" box is checked. The top horizontal slider bar controls the GPU clock rate and the one beneath it controls the memory clock rate. Drag the bars to the left to underclock. The blue part of a slider bar is the suggested clock range for that video card. RivaTuner allows you to go outside of that clock range. Once you have the clock rates where you want them, click the "Test" button to do a quick reliability test. Then click "OK" or "Apply" to set the new clock rates. If you want these clock rates to be assigned every time the machine boots, then make sure that the "Apply overclocking at Windows startup" box is checked. Click the "Defaults" button to return the clock rates to their original values.
Home| Contact | Products | Support |Infomation |||
![]()